Flask, Celery, and Ansible
Implementing Celery with Flask for Asynchronous Ansible Playbook Execution
Implementing Celery with Flask for Asynchronous Ansible Playbook Execution
Introduction
Managing infrastructure efficiently is crucial for modern software development and operations. Automating these tasks using tools like Ansible simplifies the process, but integrating these tasks into a web application can provide a more interactive and user-friendly experience. In this post, we will explore how to build a Flask app that uses Celery to run Ansible playbooks asynchronously, with real-time progress updates displayed on the frontend. This setup allows users to initiate tasks, monitor their progress, and view results—all from a convenient web interface.
Project Overview
Our project utilizes Flask for the web interface, Celery for task management, and Redis as a message broker. The Ansible playbook is executed asynchronously, allowing the web application to remain responsive while the playbook runs. The progress of the playbook execution is tracked and displayed to the user via client-side JavaScript.
You can find the complete codebase on GitHub here. This post will focus on the key parts of the setup and implementation.
Key Components and Setup
Setting up the Environment
Redis
Redis acts as the message broker for Celery, handling the communication between the Flask app and the Celery worker. Redis is lightweight, fast, and easy to set up, making it an excellent choice for this task.
To install Redis on Ubuntu/Debian, follow these steps:
1
2
3
4
5
6
7
8
9
10
11
sudo apt update
sudo apt install redis-server

# Enable Redis to start on system boot
sudo systemctl enable redis-server

# Start Redis server
sudo systemctl start redis-server

# Test connectivity - expecting PONG response
redis-cli ping
Note: By default, Redis binds to localhost for security reasons. If your application is not running on the same machine as Redis, you will need to change the bind setting in /etc/redis/redis.conf to your server’s IP address.
Setting up Flask and Celery
First, we need to integrate Celery with our Flask application. Using the factory pattern (a common practice for setting up Flask applications), we will configure Celery to work alongside Flask.
Configuration (config.py):
In your Flask configuration, add settings for Celery:
1
2
3
4
class Config:
    SECRET_KEY = 'your_secret_key'
    CELERY_BROKER_URL = 'redis://localhost:6379/0'
    CELERY_RESULT_BACKEND = 'redis://localhost:6379/0'
These settings tell Celery to use Redis as the broker and backend.
Initializing Flask and Celery (extensions.py and __init__.py):
Create a Celery instance and integrate it with the Flask app using the create_app() method. This approach ensures that Celery uses the same configuration as the Flask app.
1
2
3
4
5
6
7
8
9
10
11
12
13
14
15
16
17
18
19
20
21
22
23
24
25
26
27
# extensions.py
from celery import Celery

def make_celery(app):
    celery = Celery(
        app.import_name,
        backend=app.config['CELERY_RESULT_BACKEND'],
        broker=app.config['CELERY_BROKER_URL']
    )
    celery.conf.update(app.config)
    return celery

# __init__.py
from flask import Flask
from .extensions import make_celery

def create_app():
    app = Flask(__name__)
    app.config.from_object('config.Config')

    # Initialize Celery with the Flask app context
    celery = make_celery(app)

    # Additional setup (e.g., blueprints, extensions)
    # ...

    return app
Creating the Celery Worker
The Celery worker is responsible for running the tasks defined in your application. It operates independently of the Flask application, pulling tasks from the Redis broker, executing them, and then storing the results back in Redis.
The celery worker can be stored and created in another python file in the root of the project directory:
1
2
3
4
5
6
7
8
9
# celery_worker.py
from app import create_app
from app.extensions import celery

app = create_app()

if __name__ == '__main__':
    app.app_context().push()
    celery.start()
To start the celery worker, use the following command:
1
celery -A celery_worker.celery worker --loglevel=INFO
Creating the Celery Task
The core functionality involves running an Ansible playbook asynchronously and tracking its progress. This is handled by a Celery task, which captures and reports the playbook’s progress.
Celery Task (tasks.py):
This task runs the Ansible playbook and parses the output to update the progress. It uses the subprocess module to execute the playbook and captures the output for real-time tracking.
1
2
3
4
5
6
7
8
9
10
11
12
13
14
15
16
17
18
19
20
21
22
23
24
25
26
27
28
29
30
31
32
33
34
35
36
37
38
39
40
41
42
43
44
45
46
# tasks.py
import subprocess
import yaml
from pathlib import Path
from .extensions import celery

@celery.task(bind=True)
def run_ansible_playbook(self):
    playbook_path = Path('app/playbooks/playbook.yml')

    try:
        # Load the playbook to count the number of tasks
        with playbook_path.open() as f:
            playbook_data = yaml.safe_load(f)
            total_tasks = sum(len(play.get('tasks', [])) for play in playbook_data)
    except Exception as e:
        raise Exception(f"Error loading playbook: {e}")

    try:
        # Execute the playbook
        process = subprocess.Popen(
            ['ansible-playbook', str(playbook_path)],
            stdout=subprocess.PIPE,
            stderr=subprocess.PIPE,
            text=True
        )
    except Exception as e:
        raise Exception(f"Error running playbook: {e}")

    completed_tasks = 0

    # Parse the output for task progress
    for line in process.stdout:
        if 'TASK [' in line:
            completed_tasks += 1
            task_name = line.split('TASK [')[1].split(']')[0].strip()
            progress = int((completed_tasks / total_tasks) * 100)
            self.update_state(state='PROGRESS', meta={'output': f"Running task: {task_name}", 'progress': progress})

    process.wait()

    if process.returncode != 0:
        error_output = process.stderr.read()
        raise Exception(f"Playbook failed: {error_output}")

    return {'status': 'Playbook completed successfully!', 'progress': 100}
To accompany this task, we also set up routes to initiate the task and fetch the progress.
Routes (routes.py):
These routes start the Celery task and check its status.
1
2
3
4
5
6
7
8
9
10
11
12
13
14
15
16
17
18
19
# routes.py
from flask import Blueprint, jsonify, request
from .tasks import run_ansible_playbook

main = Blueprint('main', __name__)

@main.route('/start_task', methods=['POST'])
def start_task():
    task = run_ansible_playbook.apply_async()
    return jsonify({'task_id': task.id}), 202

@main.route('/task_status/<task_id>')
def task_status(task_id):
    task = run_ansible_playbook.AsyncResult(task_id)
    response = {
        'state': task.state,
        'info': task.info if task.state == 'PROGRESS' else str(task.info)
    }
    return jsonify(response)
Frontend Integration
The frontend is responsible for interacting with the user, initiating the playbook execution, and displaying progress updates. This is done using JavaScript.
JavaScript for Real-Time Updates (app/static/js/app.js):
This script handles button clicks, initiates the playbook task, and updates the progress bar based on task status.
1
2
3
4
5
6
7
8
9
10
11
12
13
14
15
16
17
18
19
20
21
22
23
24
25
26
27
28
29
30
31
32
33
34
document.addEventListener('DOMContentLoaded', function () {
    var startTaskButton = document.getElementById('startTaskButton');
    var taskOutput = document.getElementById('taskOutput');
    var progressBar = document.getElementById('progressBar');

    startTaskButton.addEventListener('click', function () {
        fetch('/start_task', {
            method: 'POST',
            headers: { 'Content-Type': 'application/json' }
        }).then(response => response.json())
          .then(data => {
              var taskId = data.task_id;
              var checkTaskStatus = setInterval(function () {
                  fetch('/task_status/' + taskId)
                      .then(response => response.json())
                      .then(data => {
                          if (data.state === 'SUCCESS') {
                              clearInterval(checkTaskStatus);
                              taskOutput.textContent += "Playbook completed successfully.\n";
                              progressBar.style.width = "100%";
                              progressBar.textContent = "100%";
                          } else if (data.state === 'PROGRESS') {
                              taskOutput.textContent += data.info.output + "\n";
                              progressBar.style.width = data.info.progress + "%";
                              progressBar.textContent = data.info.progress + "%";
                          } else if (data.state === 'FAILURE') {
                              clearInterval(checkTaskStatus);
                              taskOutput.textContent += "Playbook failed.\n";
                          }
                      });
              }, 1000);
          });
    });
});
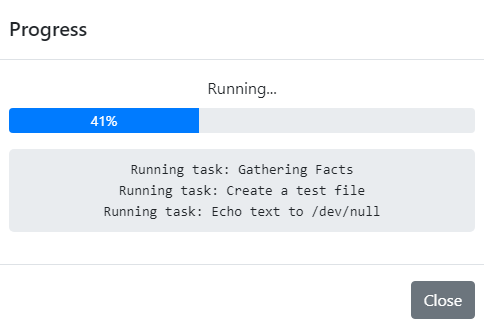
After adding some front-end HTML, which can be found in the GitHub repository, you will be able to click the button and the task will be run while displaying updates to the user.
Conclusion
Integrating Ansible playbooks into a Flask application using Celery allows for efficient asynchronous execution and monitoring. This setup provides a seamless user experience, where users can start tasks and receive real-time updates on their progress. This system can be extended with additional features such as authentication, detailed logging, and more sophisticated error handling to cater to a variety of use cases.
For the full code and additional setup details, visit the GitHub repository.